Docs

Docs

  • Develop
  • Validate
  • Integrate
  • Learn

›Wallet

Welcome to Elrond

  • Welcome to Elrond

Technology

  • Architecture Overview
  • Glossary
  • Entities
  • Chronology
  • Secure Proof of Stake
  • Adaptive State Sharding
  • The Elrond WASM VM
  • Cross Shard Transactions

Wallet

  • Wallets - Overview
  • Web Wallet
  • Maiar Web Wallet Extension
  • Webhooks
  • Ledger
  • Web Wallet Tokens

Tokens

  • Native Tokens
  • ESDT tokens
  • NFT tokens

Validators

  • Validators - Overview
  • System Requirements
  • Install a Mainnet Node

    • Scripts & User config
    • Installing a Validator Node
    • Optional Configurations
    • How to use the Docker Image

    Install a Testnet/Devnet Node

    • Scripts & User config
    • Installing a Validator Node
    • Manage a validator node
    • How to use the Docker Image

    Manage your keys

    • Validator Keys
    • Wallet Keys
    • Protecting your keys

    Staking, Unstaking, Unjailing

    • Staking, unstaking and unjailing
    • Staking
    • Unjailing
    • The Staking Smart Contract
  • The Delegation Manager
  • Convert An Existing Validator Into A Staking Pool
  • Merging A Validator Into An Existing Delegation Smart Contract
  • Rating
  • Elrond Node upgrades
  • Node redundancy
  • Import DB
  • Node CLI
  • Node Databases
  • Useful Links & Tools
  • FAQs

Developers

  • Developers - Overview
  • Tutorials

    • Build a dApp in 15 minutes
    • Build a Microservice for your dApp
    • The Crowdfunding Smart Contract (part 1)
    • The Crowdfunding Smart Contract (part 2)
    • The Counter Smart Contract
    • Custom Wallet Connect

    Signing Transactions

    • Signing Transactions
    • Tools for signing
    • Signing programmatically

    Gas and Fees

    • Overview
    • EGLD transfers (move balance transactions)
    • System Smart Contracts
    • User-defined Smart Contracts

    Developer reference

    • The Elrond Serialization Format
    • Smart contract annotations
    • Smart contract modules
    • Smart contract to smart contract calls
    • Code Metadata
    • Smart Contract API Functions
    • Storage Mappers
    • Rust Testing Framework
    • Rust Testing Framework Functions Reference
    • Rust Smart Contract Debugging
    • Random Numbers in Smart Contracts

    Developers Best Practices

    • Basics
    • BigUint Operations
    • The dynamic allocation problem
    • Multi-values

    Mandos tests reference

    • Mandos Overview
    • Mandos Structure
    • Mandos Simple Values
    • Mandos Complex Values
    • Embedding Mandos code in Go
  • Constants
  • Built-In Functions
  • Account storage
  • Setup a Local Testnet
  • Set up a Local Testnet (advanced)
  • Creating Wallets

SDK and Tools

  • SDKs and Tools - Overview
  • REST API

    • REST API overview
    • api.elrond.com
    • Gateway overview
    • Addresses
    • Transactions
    • Network
    • Nodes
    • Blocks
    • Virtual Machine
    • Versions and Changelog
  • Proxy
  • Elasticsearch
  • erdpy

    • erdpy
    • Installing erdpy
    • Configuring erdpy
    • erdpy CLI
    • Deriving the Wallet PEM file
    • Sending bulk transactions
    • Writing and running erdpy scripts
    • Smart contract interactions

    erdjs

    • erdjs
    • Cookbook
    • Extending erdjs
    • Writing and testing interactions
    • Migration guides
    • Signing Providers for dApps
  • erdgo
  • erdcpp
  • erdjava
  • erdkotlin
  • erdwalletjs-cli

Integrators

  • Integrators - Overview
  • EGLD integration guide
  • ESDT tokens integration guide
  • Observing Squad
  • Accounts Management
  • Creating Transactions
  • Querying the Blockchain

Web Wallet Tokens

Introduction

ESDT stands for Elrond Standard Digital Token.

Elrond network natively supports the issuance of custom tokens, without the need for contracts such as ERC20, but addressing the same use-cases. You can create and issue an ESDT token from Elrond web wallet in a few steps. Let's go over these steps.

Prerequisites

  • A wallet on Elrond Network.
  • 0.05 EGLD issuance fee
  • fees for transactions

Creating a fungible token from Web Wallet

To get started, open up the Elrond web wallet. You can create a new wallet if you do not have one or import your existing wallet. Here is a guide to help you navigate.

On the left sidebar, you will notice the ISSUE section.
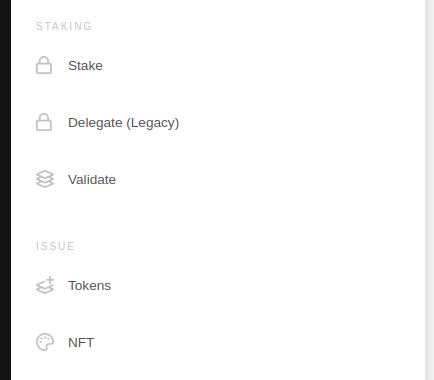
sidebar

Click on Tokens.

issue-token}

note

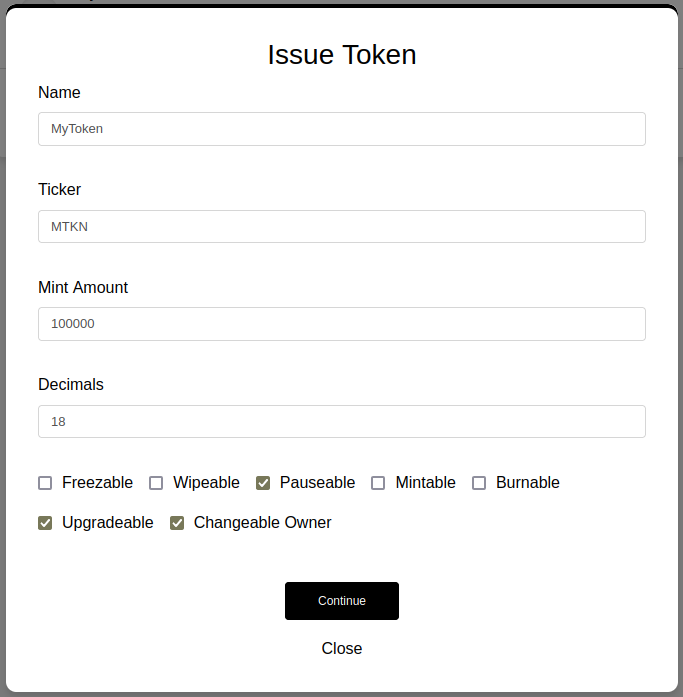
The Web Wallet will handle the preparation of the transaction. Therefore, if you'd want a token with a supply of 10 and 2 decimals, you should simply put 10 as supply and 2 as number of decimals.

When creating a token, you are required to provide the token name, a ticker, the initial supply, and the number of decimals. In addition to these, tokens' properties should be set.

Useful resources:

  • Token parameters format - constraints about length, charset and so on.
  • Token properties - what the properties stand for.

Enter the required details. Next, click on Continue button to proceed. You will have to review the transaction and sign it, if everything looks good.

Once the transaction is processed, your token will be issued.

Finding the token identifier

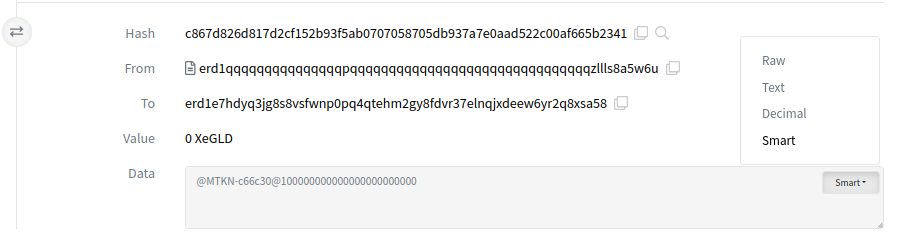
The token identifier of a token is unique. It is composed by the token ticker, a - char, followed by 6 random hex characters. Example: MTKN-c66c30.

Because the token identifier isn't deterministic, it can be found only after issuing it. There are 2 ways of finding it:

  1. On the Explorer page of the issue transaction, you will see a Smart Contract Result which has a data field similar to: @4d544b4e2d373065323338@152d02c7e14af6800000. On the right side, choose Smart and you will able to see the decoded parameters. In this example, the token identifier is MTKN-c66c30.

Token issue SCR

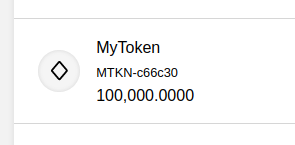
  1. From the Web Wallet, go to TOKENS tab from the left sidebar, and you can see the token there, including its identifier.

Token view in Web Wallet

Transfer a token from your wallet

You can transfer an amount of a token to another account. To get started, open up the Elrond web wallet.

Navigate to the Tokens tab, and click on Send for the token you want to transfer.

Web Wallet Tokens page

On the pop-up, introduce the recipient and the amount you want to send. Then press Send.

Web Wallet Transfer Token

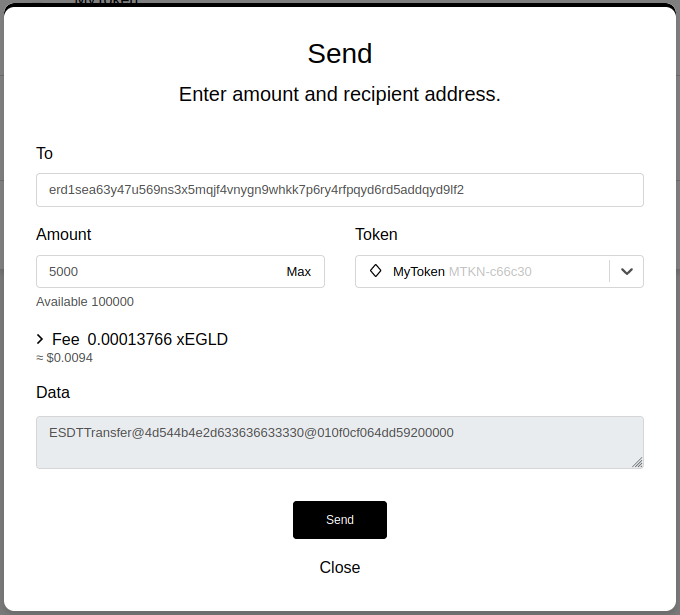
Once the transaction is successfully executed, the recipient should receive the amount of tokens.

Managing a token from Web Wallet

At the time of writing, a dashboard for tokens owners is still under construction. Meanwhile, token operations have to be done manually, by following the transaction formats described here.

← LedgerNative Tokens →
  • Introduction
  • Prerequisites
  • Creating a fungible token from Web Wallet
    • Finding the token identifier
  • Transfer a token from your wallet
  • Managing a token from Web Wallet
Made withby the Elrond team.
GithubChat
Main siteWalletExplorerBridgeDocsGrowthMaiarMaiar Exchange