Docs

Docs

  • Develop
  • Validate
  • Integrate
  • Learn

›Install a Mainnet Node

Welcome to Elrond

  • Welcome to Elrond

Technology

  • Architecture Overview
  • Glossary
  • Entities
  • Chronology
  • Secure Proof of Stake
  • Adaptive State Sharding
  • The Elrond WASM VM
  • Cross Shard Transactions

Wallet

  • Wallets - Overview
  • Web Wallet
  • Maiar Web Wallet Extension
  • Webhooks
  • Ledger

Tokens

  • Native Tokens
  • ESDT tokens
  • NFT tokens

Validators

  • Validators - Overview
  • System Requirements
  • Install a Mainnet Node

    • Scripts & User config
    • Installing a Validator Node
    • Optional Configurations
    • How to use the Docker Image

    Install a Testnet/Devnet Node

    • Scripts & User config
    • Installing a Validator Node
    • Manage a validator node
    • How to use the Docker Image

    Manage your keys

    • Validator Keys
    • Wallet Keys
    • Protecting your keys

    Staking, Unstaking, Unjailing

    • Staking, unstaking and unjailing
    • Staking
    • Unjailing
    • The Staking Smart Contract
  • The Delegation Manager
  • Convert An Existing Validator Into A Staking Pool
  • Merging A Validator Into An Existing Delegation Smart Contract
  • Rating
  • Elrond Node upgrades
  • Node redundancy
  • Import DB
  • Node CLI
  • Node Databases
  • Useful Links & Tools
  • FAQs

Developers

  • Developers - Overview
  • Tutorials

    • Build a dApp in 15 minutes
    • Build a Microservice for your dApp
    • The Crowdfunding Smart Contract (part 1)
    • The Crowdfunding Smart Contract (part 2)
    • The Counter Smart Contract
    • Custom Wallet Connect

    Signing Transactions

    • Signing Transactions
    • Tools for signing
    • Signing programmatically

    Gas and Fees

    • Overview
    • EGLD transfers (move balance transactions)
    • System Smart Contracts
    • User-defined Smart Contracts

    Developer reference

    • The Elrond Serialization Format
    • Smart contract annotations
    • Smart contract modules
    • Smart contract to smart contract calls
    • Smart Contract Developer Best Practices
    • Code Metadata
    • Smart Contract API Functions
    • Storage Mappers
    • Rust Testing Framework
    • Rust Testing Framework Functions Reference
    • Rust Smart Contract Debugging
    • Random Numbers in Smart Contracts

    Developers Best Practices

    • Basics
    • BigUint Operations
    • The dynamic allocation problem
    • Multi-values

    Mandos tests reference

    • Mandos Overview
    • Mandos Structure
    • Mandos Simple Values
    • Mandos Complex Values
    • Embedding Mandos code in Go
  • Constants
  • Built-In Functions
  • Account storage
  • Setup a Local Testnet
  • Set up a Local Testnet (advanced)
  • Creating Wallets

SDK and Tools

  • SDKs and Tools - Overview
  • REST API

    • REST API overview
    • api.elrond.com
    • Gateway overview
    • Addresses
    • Transactions
    • Network
    • Nodes
    • Blocks
    • Virtual Machine
    • Versions and Changelog
  • Proxy
  • Elasticsearch
  • erdpy

    • erdpy
    • Installing erdpy
    • Configuring erdpy
    • erdpy CLI
    • Deriving the Wallet PEM file
    • Sending bulk transactions
    • Writing and running erdpy scripts
    • Smart contract interactions

    erdjs

    • erdjs
    • Cookbook
    • Extending erdjs
    • Writing and testing interactions
    • Migration guides
    • Signing Providers for dApps
  • erdgo
  • erdcpp
  • erdjava
  • erdkotlin
  • erdwalletjs-cli

Integrators

  • Integrators - Overview
  • EGLD integration guide
  • ESDT tokens integration guide
  • Observing Squad
  • Accounts Management
  • Creating Transactions
  • Querying the Blockchain

Scripts & User config

Elrond provides scripts designed to streamline the process of installing an Elrond node. You will start by getting a copy of the latest version of the scripts from GitHub, and configure it to match your local setup.

Download the Elrond Scripts

cd ~
git clone https://github.com/ElrondNetwork/elrond-go-scripts-mainnet

Configure the scripts correctly

The scripts need a few options to be set in order to work correctly.

First and foremost, you need your exact username on the machine. You can find out your current username by using the whoami command, which will print it out:

whoami

Next, we need to edit the variables.cfg file and add your username in the following variables:

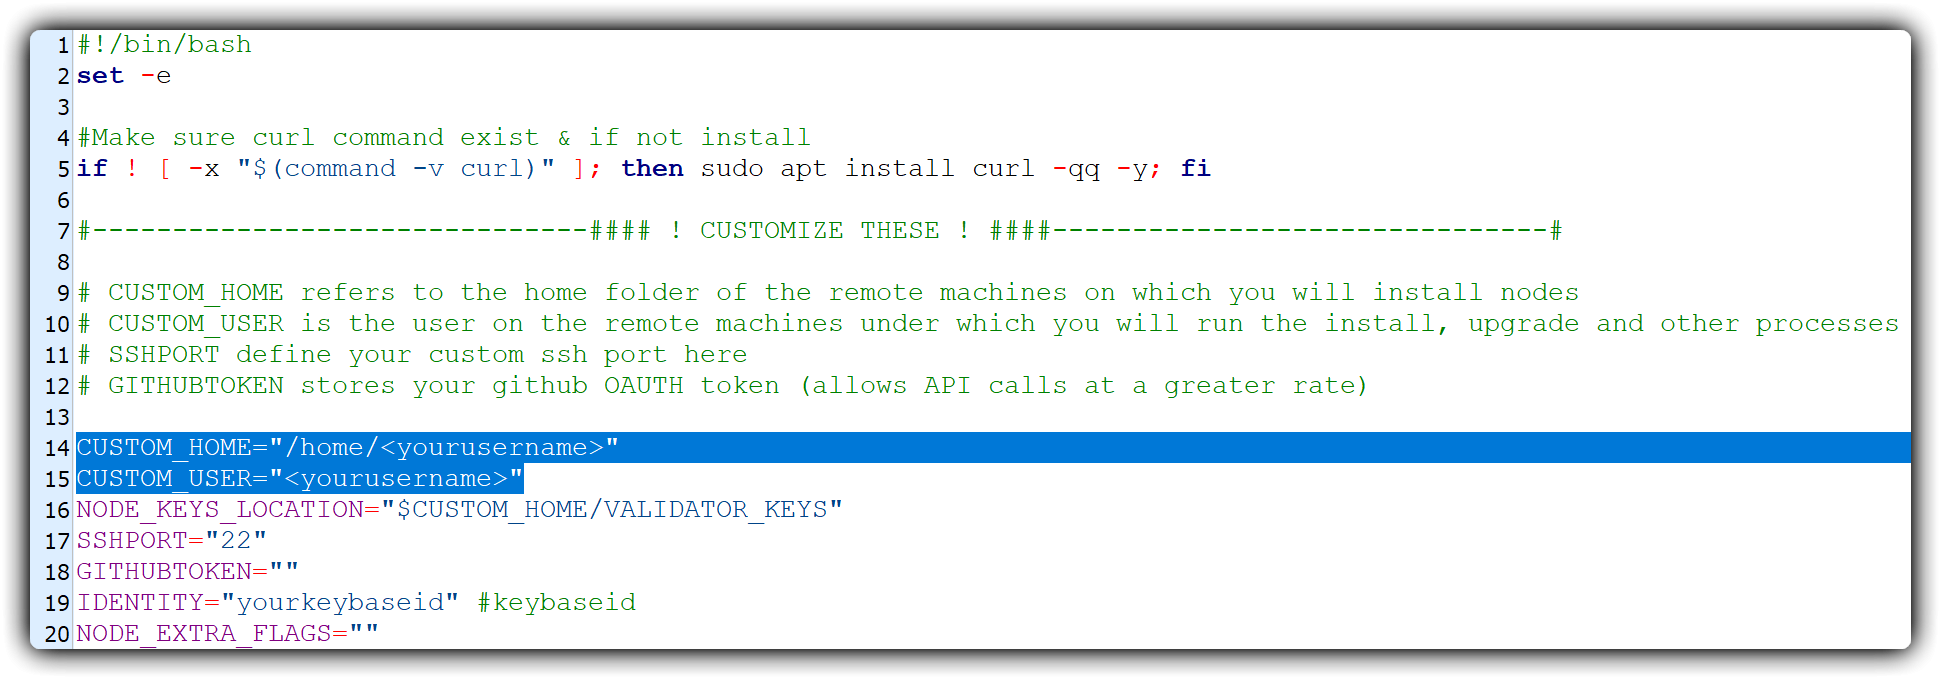
  • CUSTOM_HOME, which refers to the folder on the computer in which you will install your nodes
  • CUSTOM_USER, which is the username on the computer under which you will run the installation, upgrade and other processes

Open variables.cfg in the nano editor:

cd ~/elrond-go-scripts-mainnet/config
nano variables.cfg

Change the variables CUSTOM_HOME and CUSTOM_USER, as indicated in the screenshot:

img

Replace with the returned output of the "whoami" command

Save the file and exit :

  • if you’re editing with nano, press Ctrl+X, then yand then Enter
  • if you’re editing with vi or vim, hold down Shift and press z twice

Ensure user privileges

Your user should be sudo capable, so that it doesn't ask a password every time it executes something. If you already know this to be true, skip ahead. Otherwise, you need to add your username to a special list.

So let's add it to the overrides:

sudo visudo -f /etc/sudoers.d/myOverrides

Now navigate to the end of the file, by pressing Shift + G. Now press o to add a new empty line, and type the following, replacing username with what you got from running the whoami command:

yourusername ALL=(ALL) NOPASSWD:ALL

Conclude by pressing Esc, then save and close the file by holding down Shift while pressing z twice.

Your user should now be able to execute sudo commands.

← System RequirementsInstalling a Validator Node →
  • Download the Elrond Scripts
  • Configure the scripts correctly
  • Ensure user privileges
Made withby the Elrond team.
GithubChat
Main siteWalletExplorerBridgeDocsGrowthMaiarMaiar Exchange